
Do you already have a sensor, a FizziQ Connect module or a microcontroller producing a measurement? This guide explains how to transmit that measurement to FizziQ or to FizziQ Web, and how to work with its data. Three possible paths, from the simplest to the most open:
- FizziQ Connect: no programming at all — the box recognizes the plugged-in sensor and streams its measurements over Bluetooth;
- a microcontroller over Bluetooth Low Energy (Arduino, ESP32, micro:bit or an HM-10 module) to the mobile app;
- a microcontroller over USB to FizziQ Web, on a computer.
The guide covers how FizziQ’s Bluetooth module works, the connection modes, the message format and recognized prefixes, then the wired USB connection at the end.
Want to build your own instrument with Arduino, micro:bit or ESP32? See the guide Building a scientific instrument with Arduino, micro:bit or ESP32: choosing a board, sensors, calibration, acquisition and uncertainties. In one sentence: this guide explains how to connect the measurement to FizziQ, that one explains how to produce it.
How FizziQ uses Bluetooth Low Energy (BLE)
FizziQ uses the standard Bluetooth Low Energy (BLE) technology to communicate with external sensors. BLE, also known as Bluetooth Smart, differs from classic Bluetooth in several important ways:
- Low energy consumption: ideal for battery-powered sensors and devices.
- Fast connection: the link is established in a few milliseconds.
- Broadcasting mode: lets devices send data without an established connection.
- Simplified communication protocol: suited to transferring small amounts of data.
- Compatibility with recent mobile devices: built into every modern smartphone.
Important: the FizziQ app is only compatible with devices using BLE technology. Classic Bluetooth devices are not supported.
What FizziQ’s Bluetooth module can do
FizziQ’s Bluetooth module uses the smartphone’s BLE capabilities to:
- connect external sensors through standard BLE technology;
- display sensor data in real time;
- record the data in the experiment notebook;
- remotely start and stop recordings;
- use an external clock for time synchronization;
- collect data from several sensors simultaneously.
Operating modes
FizziQ’s BLE module offers two main operating modes.
Point-to-point mode: direct connection to a specific BLE device.
- Stable connection with a single device.
- Suited to experiments requiring two-way communication.
- Allows commands to be sent to the connected device.
- Uses the UART over BLE protocol (specific UUID services).
Radio mode: receiving data broadcast by several BLE devices at once.
- Receives data from several sensors without establishing a full connection.
- Uses the data broadcast by BLE peripherals (advertising data).
- Ideal for sensor networks and distributed data collection.
- Offers optional filtering to focus on a specific device.
Using the BLE module in the FizziQ app
Connecting a BLE device
To connect a BLE sensor to the FizziQ app:
- Open the Bluetooth module: open the FizziQ app, tap the menu icon (☰) at the top left, then select “Bluetooth”.
- Search and connect: the app automatically lists nearby BLE devices, FizziQ-compatible devices first. If no device appears, tap the refresh button at the top of the screen. Tap the “Connect” button next to the device you want, then wait for the confirmation message.
- For devices that don’t show up: tap “Show other devices” at the bottom of the screen, and make sure the device is powered on and discoverable.
Selecting and displaying sensors
Once the connection is established:
- Back to the main screen: the app returns to it automatically, and an active Bluetooth icon appears in the status bar.
- Selecting a sensor: open the instruments menu, then scroll down to the “External sensors” section. Detected sensors are listed there with their type (temperature, acceleration…); select the one you want to display.
- Configuring the display: use the standard display options (graph, numerical value…) and adjust the settings with the gear icon. In Multi mode, you can display several BLE sensors on separate rows, alongside the built-in sensors.
- Recording data: use the standard record button (red circle). BLE sensor data receives the same timestamps as the built-in sensors’ data. The BLE device can also start and stop the recording remotely with the special
enrandstocommands. - Disconnecting: go back to the Bluetooth menu to disconnect, or simply switch the BLE device off.
FizziQ Connect modules
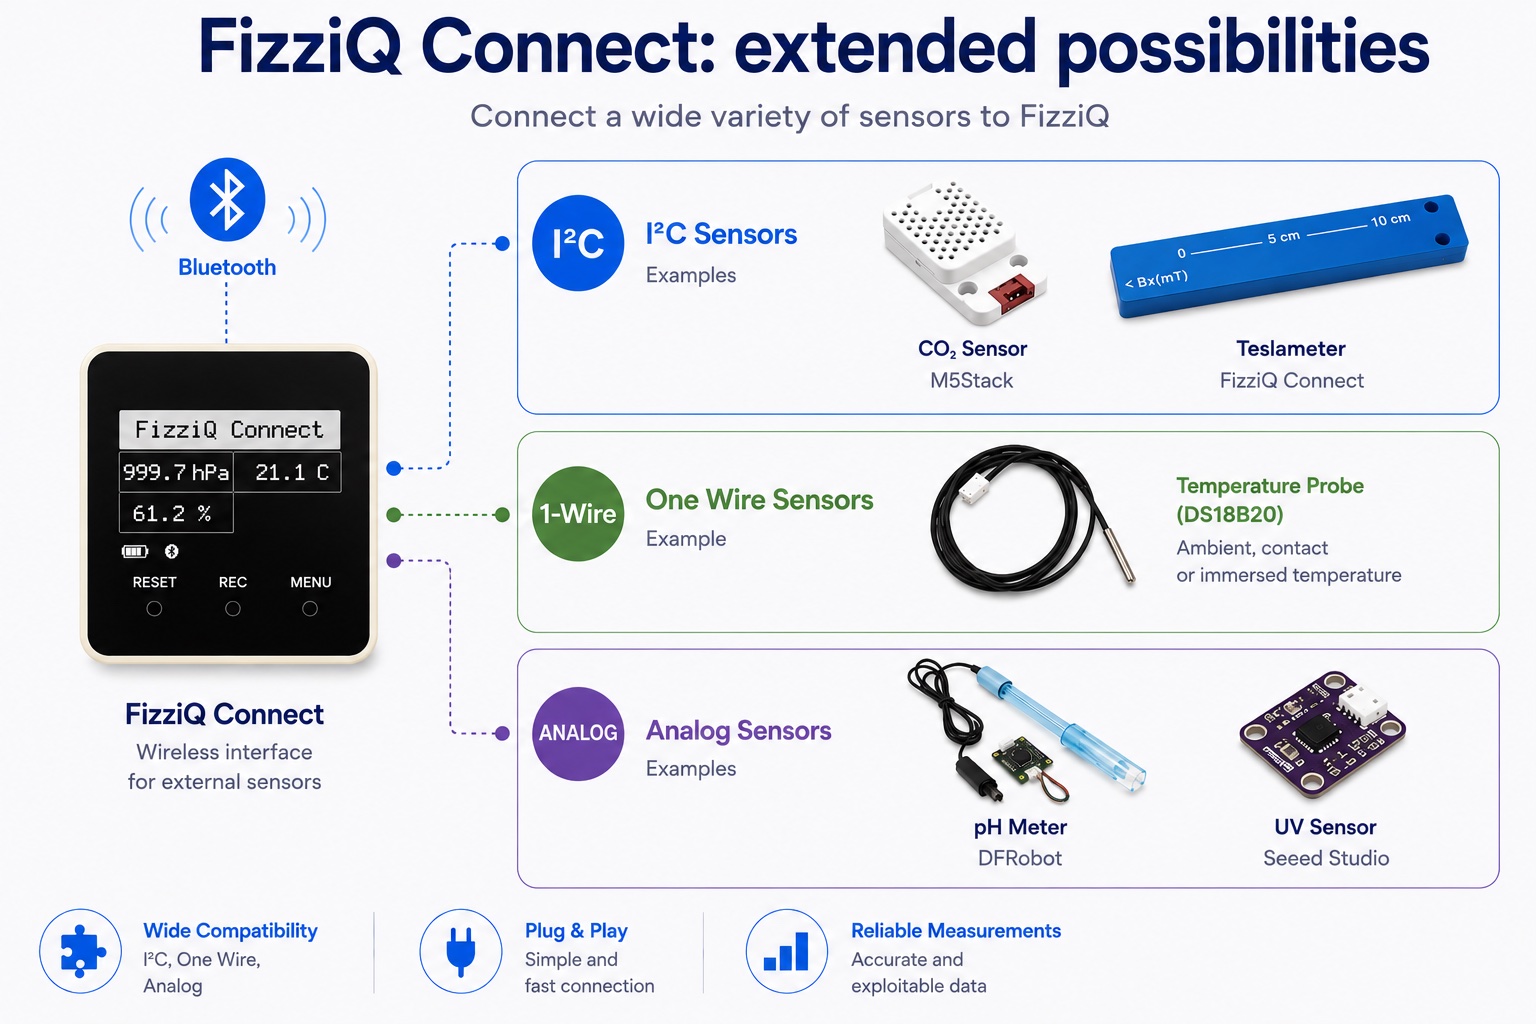
FizziQ Connect modules are the simplest way to connect I²C, One Wire or analog sensors to FizziQ: preconfigured Bluetooth devices, with no programming at all, that recognize the plugged-in sensor and stream its measurements to the app.
Module types
FizziQ Connect Standard
- Traditional point-to-point module.
- Two-way communication.
- Supports a wide variety of external sensors.
FizziQ Radio
- Data-broadcasting modules.
- Transmission without an established connection.
- Ideal for distributed sensor networks.
- Recognizable by the “FizziQ Radio” prefix in the device name.
Compatible sensors
FizziQ Connect modules can be fitted with many types of sensors: temperature, humidity, pressure, acceleration, light, magnetic field, CO2, various detectors, and more.
Connecting a microcontroller
FizziQ can communicate with a wide variety of microcontrollers (Arduino, ESP32, micro:bit, etc.) fitted with a Bluetooth module. For full documentation and detailed code examples, see the external sensors page.
Basic principles
Connecting a microcontroller to FizziQ relies on three essential principles.
UART communication over Bluetooth
- Use a compatible Bluetooth module (HM-10, HC-05…) or a microcontroller with built-in Bluetooth.
- Configure the Bluetooth link to use a compatible UART service.
Message format
- Follow the
sensor_name:value[:clock]\nformat. - Use the sensor prefixes recognized by FizziQ (see the “Supported sensor types” section).
Sending rate
- Send data at regular intervals (recommended: 200 to 500 ms).
- Avoid sending too much data at once, so as not to saturate the connection.
Using the HM-10 module
The HM-10 module is an inexpensive, widely available Bluetooth Low Energy module that can be used to connect sensors to FizziQ. For detailed instructions and wiring examples, see the external sensors page.
Data structure
Message format
The message format expected by FizziQ is the following:
sensor_name:value[:clock]\n
Where:
sensor_nameidentifies the sensor type (e.g. “temperature”, “acceleration”);valueis the sensor reading (usually a decimal number, with a point as the decimal separator);clock(optional) is a timestamp for time synchronization;\nis the newline character that ends the message.
Examples:
temperature:25.5
pressure:1013.25
tension:3.3:12500
Supported sensor types
FizziQ automatically recognizes external sensors by analysing the prefix of the name used in the messages. Here is the complete list of recognized prefixes and the corresponding sensors:
| Prefix | Sensor type | Default unit | Example message |
|---|---|---|---|
wei / poi | Weight | kg | poids:0.32 |
hum | Humidity | % | humidity:45.2 |
ten | Voltage | V | tension:3.3 |
pre | Atmospheric pressure | hPa | pressure:1013.25 |
tem | Temperature | °C | temperature:25.5 |
acc | Absolute acceleration (external) | m/s² | acceleration:9.81 |
lum | Illuminance | lux | luminosite:500 |
mag | Magnetic field | mT | magnetisme:2.5 |
com / bou | Magnetic north (compass) | ° | compass:154.2 |
co2 | CO₂ | ppm | co2:450 |
det | Detection | - | detection:1 |
tvo | TVOC (volatile organic compounds) | ppb | tvoc:120 |
int | Current (ammeter) | A | intensite:0.25 |
dis | Distance | mm | distance:155 |
son | Probe (waterproof temperature) | °C | sonde:21.5 |
inf | Infrared (IR thermometer) | °C | infrarouge:36.4 |
pou | Pulse | bpm | pouls:72 |
pm2 | PM 2.5 (fine particles) | µg/m³ | pm25:15.5 |
o2 | Oxygen | % | oxygene:20.9 |
res | Resistivity | % | resistivite:12 |
uv | UV index | - | uv:3.2 |
ph | pH | - | ph:7.2 |
niv | Sound level (external) | dB | niveau:65 |
rot | Rotation | rpm | rotation:120 |
If no prefix is recognized but the message has the right format, FizziQ displays the sensor as a generic “External sensor”.
Note: for optimal recognition, place the exact prefix at the beginning of your sensor’s name. For example, temperature:23.5 will be recognized as a temperature sensor, but ma_temperature:23.5 could be recognized as a magnetic sensor because of the “ma” prefix.
Wired USB connection with FizziQ Web
On a computer, FizziQ Web offers an alternative to Bluetooth: a wired connection over a USB cable. A FizziQ Connect module or a microcontroller plugged into the computer sends its measurements over its serial port, and FizziQ Web displays, plots and records them in real time.
What it is for
- Using sensors the computer doesn’t have: temperature, humidity, pressure, distance, CO₂, pH, voltage, mass, illuminance…
- Recording several sensors at the same time on a common time base, up to six channels.
- Transferring the measurements into the experiment notebook to analyse them in the spreadsheet, plot graphs and write a report.
- Doing computer-assisted experimentation in class without installing anything: everything happens in the browser.
Compared to Bluetooth, the wired link is simpler and more reliable: no pairing, no battery, no interference, and it works on computers without Bluetooth.
What you need
- A compatible browser: Chrome, Edge or Opera. Firefox and Safari do not support the serial link.
- FizziQ Web over https (https://fizziqweb.web.app): the serial link is refused on a page opened over http.
- A USB data cable: many cables only carry charge.
- A device that speaks FizziQ: a FizziQ Connect (firmware 3.2.3 or later, with a sensor plugged in), or a microcontroller programmed to send its measurements in the format described below.
- The driver for the device’s USB-serial chip if the system does not recognize it: CH340, CP210x (ESP32) or FTDI. Arduino Uno/Mega boards and the Raspberry Pi Pico are recognized without a driver.
Connecting the device
- Prepare the device. Upload the program to the microcontroller (or switch on the FizziQ Connect with a sensor plugged in) and connect it to the computer. Close any program already using the serial port: the Arduino IDE’s serial monitor, a terminal, another FizziQ tab. A serial port can only be opened by one program at a time.
- Open the module. In the FizziQ Web sidebar, click “External sensors”, then choose “USB connection”. On first use, a message lists the prerequisites; click “Continue”.
- Choose the port. Click “Connect”. The browser shows the list of available serial ports, named after their chip (Arduino, CH340, Silicon Labs for the ESP32, FTDI, Raspberry Pi Pico…). Select your device and confirm.
- Check. As soon as the first measurements arrive, FizziQ switches to the instruments screen: the status changes to “Connected”, a card appears for each detected sensor and the graph starts plotting. If nothing arrives for ten seconds, FizziQ disconnects on its own (see the troubleshooting below).
On subsequent openings, FizziQ Web automatically reconnects to the same device if it is plugged in. To disconnect, click “Disconnect” or simply unplug the cable.
Sending data from a microcontroller
With a FizziQ Connect, there is nothing to program. With your own microcontroller, the principle is the same as over Bluetooth, with one difference: each line starts with the FZ signature followed by a channel number.
FZ<channel>:sensor_name:value[:clock]\n
FZ: mandatory signature. Any line that does not start withFZ0:toFZ5:is ignored, which lets you keep any debugging messages on the same port.<channel>: a digit from 0 to 5, to tell identical sensors apart (three thermometers onFZ0,FZ1andFZ2).sensor_name: a name starting with one of the recognized prefixes (see “Supported sensor types” above); case does not matter.value: a number, with a point as the decimal separator.clock(optional): a timestamp in milliseconds, for examplemillis(). If present, FizziQ uses it as the time base; otherwise it timestamps on reception.
Examples:
FZ0:temperature:25.3
FZ0:humidite:65.2
FZ1:pression:1013.25:12840
Minimal example for Arduino or ESP32, two measurements per second:
void setup() {
  Serial.begin(115200);   // same speed as in FizziQ Web (115200 by default)
}

void loop() {
  float t = readTemperature();   // your reading function
  Serial.print("FZ0:temperature:");
  Serial.print(t, 1);
  Serial.print(":");
  Serial.println(millis());
  delay(500);
}
As over Bluetooth, the device can drive the recording remotely by sending FZ0:enr:0 to start it and FZ0:sto:0 to stop it and transfer the measurements into the notebook.
A few rules for a clean link:
- The transmission speed must be identical on both sides. FizziQ Web uses 115200 baud by default; this setting can be changed in Settings → Connections.
- One measurement per line, 2 to 10 measurements per second per sensor. Beyond that, the graph becomes unreadable.
- Plain text only: no accented characters or binary data on the port. A packet containing a non-text byte is rejected as a whole.
- On boards with native USB (Leonardo, Pico, ESP32-S3), add
while (!Serial);afterSerial.begin()so as not to lose the first frames.
Using the measurements
The external sensors screen in FizziQ Web works like a classic instrument: click the cards of the sensors you want to follow (several at once if you wish), start the recording with the REC button, then stop it. The measurements are transferred into the experiment notebook as a table, with a time column and one column per sensor, ready for the spreadsheet and graphs.
The “Messages” button shows the last hundred lines received, as they are. It is the most useful tool to check what the device is actually sending.
Troubleshooting the USB connection
“Web Serial API not supported”. You are not in Chrome, Edge or Opera, or the page is opened over http. Use the https address.
No port in the list. Change the cable (many do not carry data) and the USB port. Check that the device is recognized by the system (Device Manager on Windows, ls /dev/tty.* on macOS, /dev/ttyUSB* or /dev/ttyACM* on Linux) and install the driver for its chip if needed. On Linux, the user must belong to the dialout group. Also check that the site has not been blocked: padlock icon in the address bar → Site settings → Serial ports.
The port appears but the connection fails or hangs. Another program is using the port: close the serial monitor and other FizziQ tabs. Unplug the cable, wait two seconds, plug it back in, then reload the page.
Connected, but no sensor appears. The port is open but FizziQ does not recognize what it receives. Open “Messages”:
| What you see | Probable cause | Solution |
|---|---|---|
| Nothing | The device is sending nothing, or not yet | Check the program and the sensor; add while (!Serial);; on FizziQ Connect, a sensor must be plugged in. |
| Unreadable characters | Different transmission speeds | Align the Serial.begin() with FizziQ’s setting (Settings → Connections). |
Readable lines without FZ | Bluetooth format used over USB | Add the FZ0: prefix at the start of each line. |
| A decimal comma or an empty value | Non-numeric value | Use a point; Serial.print(v, 1) does it automatically. |
&BINARY:... | Binary data or accented characters | Send only ASCII text, one measurement per line. |
Values jump around or the browser slows down. Reduce the sending rate, follow only the useful sensors, avoid long cables and unpowered USB hubs. For a long acquisition, disable the computer’s sleep mode.
FizziQ Connect. The firmware must be version 3.2.3 or later (the version is shown at start-up; update via Menu → MAJ on the box) and a sensor must be plugged in, with values visible on the box’s screen.
Bluetooth or USB? USB for reliability and long acquisitions on a computer; Bluetooth when the set-up has to move or when you work on a smartphone or tablet.
Troubleshooting
Connection problems
The device does not appear in the list
- Check that your smartphone’s Bluetooth is on.
- Make sure the device is powered and discoverable.
- Restart the Bluetooth device and the FizziQ app.
The connection fails
- Check that the UUID services and characteristics are correct.
- Make sure the device is not already connected to another smartphone.
- Try restarting the Bluetooth device.
The connection is unstable
- Reduce the data sending rate (recommended minimum interval: 200 ms).
- Check the Bluetooth device’s battery level.
- Bring the device closer to the smartphone.
Sensor detection problems
Sensors are not detected
- Check that the message format is correct.
- Make sure the prefixes used match those recognized by FizziQ.
- Send test messages through a serial terminal to validate the set-up.
Values are incorrect
- Check the formatting of numeric values (use a point as the decimal separator).
- Make sure the units match those expected by FizziQ.
- Calibrate your sensors if necessary.
FAQ
Can a classic Bluetooth sensor be connected to FizziQ? No. FizziQ only communicates with Bluetooth Low Energy (BLE) devices, which are more energy-efficient and built into all recent smartphones. Classic Bluetooth devices are not supported.
Which microcontrollers are compatible with FizziQ? Any that can send their measurements in the expected format: Arduino, ESP32, micro:bit, Raspberry Pi Pico… The connection is made over Bluetooth BLE (HM-10 module or built-in BLE) with the mobile app, or over a USB cable with FizziQ Web on a computer.
How do you connect an Arduino to FizziQ without Bluetooth?
Over a USB cable with FizziQ Web, in Chrome, Edge or Opera: the Arduino sends its measurements over the serial port in the FZ0:sensor_name:value format, and FizziQ Web displays and records them in real time in the browser, with nothing to install.
What data format does FizziQ expect?
One measurement per line, in the sensor_name:value[:clock] format, with a point as the decimal separator and a name starting with one of the recognized prefixes (tem, pre, hum, co2…). Over USB, the line also starts with the FZ signature followed by the channel number.
Why doesn’t my sensor appear in FizziQ? Check the message format, the name’s prefix and the decimal separator. Over Bluetooth, make sure the device is in BLE mode and discoverable; over USB, open the “Messages” button in FizziQ Web to see the lines actually received: it is the most direct diagnostic tool.